Welcome to the Egg Incubator User Manual. This guide provides essential information for setting up and operating your incubator effectively. It covers key features, safety tips, and step-by-step instructions to ensure successful hatching. Read carefully to maximize your experience and achieve optimal results.
1.1. Product Overview
The Egg Incubator is a modern, efficient device designed for hatching eggs under controlled conditions. It features automatic temperature control, humidity regulation, and egg turning, ensuring optimal incubation environments. Models like the ECO PROFI C-36 and C-70 offer capacities for 36 to 70 eggs, making them ideal for both hobbyists and professionals. The incubator is equipped with advanced sensors and alarms to monitor and maintain stable conditions. Its user-friendly interface allows easy adjustment of settings, while the durable design ensures long-term reliability. This device is perfect for incubating chicken, duck, or quail eggs with precision and care.
1.2. Purpose of the User Manual
This user manual serves as a comprehensive guide to help you understand and operate your egg incubator effectively. It provides detailed instructions for setup, usage, and maintenance, ensuring optimal performance and successful hatching. The manual covers essential topics such as safety precautions, temperature control, humidity management, and troubleshooting. By following the guidelines outlined in this manual, you can maximize the efficiency of your incubator and achieve the best possible results for your eggs. This resource is designed to be user-friendly, offering clear and concise information to support your incubation journey.
Safety Precautions
Always read the manual before use. Handle the incubator with care to avoid damage. Keep children away and ensure the unit is placed on a stable surface. Never use damaged appliances or place them near water sources. Unplug when not in use to prevent electrical hazards. Follow all safety guidelines to ensure safe operation and optimal performance.
2.1. General Safety Warnings
Read the manual carefully before using the incubator. Avoid using damaged appliances, as they may pose electrical or fire hazards. Keep the incubator away from water sources and open flames. Ensure the unit is placed on a stable, level surface to prevent tipping. Do not operate the incubator near sparks or in explosive environments. Always unplug the device when not in use or during cleaning. Handle the incubator with care, as improper use may lead to malfunction or injury. Adhere to these guidelines to ensure safe and effective operation.
2.2. Electrical Safety Tips
Always use the provided power cord to avoid electrical issues. Ensure the incubator is connected to a grounded outlet for safety. Avoid overloading the circuit with additional devices. Never expose the unit to water, as this can cause electrical hazards. Keep children away from the power cord and buttons. If the cord is damaged, discontinue use immediately. Regularly inspect the cord for wear and tear. Ensure the incubator is turned off before cleaning or performing maintenance. Follow these tips to prevent electrical accidents and maintain a safe environment for operation.
2.3. Proper Handling and Storage
Handle the incubator with care to avoid damage. Always lift it gently and avoid sudden movements. Clean the unit regularly to prevent contamination. Store the incubator in a dry, cool place away from direct sunlight and moisture. When not in use, keep it in its original packaging or a protective cover. Ensure all components, such as the power cord and accessories, are securely stored. Avoid stacking heavy objects on the incubator. Never store eggs inside the incubator during storage. Follow these guidelines to maintain the unit’s condition and ensure longevity.

Unpacking and Inventory
Carefully unpack and inspect the incubator, ensuring all components are included and undamaged. Refer to the user manual for a detailed inventory list.
3.1. What’s Included in the Box
- Incubator unit: The main device for hatching eggs.
- Power cord: For connecting the incubator to a power source.
- User manual: Detailed instructions for setup and operation.
- Protective foam: Packaging material to prevent damage during shipping.
- Egg frame or tray: For holding eggs securely during incubation.
- Water container (if applicable): For maintaining humidity levels.
Ensure all components are present and undamaged before proceeding with setup.
3.2. Checking for Completeness
After unpacking, carefully inspect the contents to ensure all components are included and undamaged. Cross-reference with the manual’s packaging list. Verify the presence of the incubator unit, power cord, user manual, egg frame, and any additional accessories like water containers. Check for visible damage or defects. Ensure all parts are accounted for to prevent setup issues later. This step is crucial for ensuring the incubator functions correctly and safely. If any items are missing or damaged, contact the supplier immediately for assistance.
3.3. Initial Inspection of the Incubator
Examine the incubator thoroughly for any signs of damage or wear. Check all exterior and interior surfaces, ensuring they are clean and free from defects. Inspect the power cord for frays or cuts and verify that all buttons and controls function properly. Look for any blockages in air vents or water reservoirs. Ensure the egg frame and turning mechanism are intact and operational. If you find any issues, do not proceed with setup—contact the manufacturer for assistance. A proper inspection ensures safe and effective operation of the incubator.

Initial Setup
Connect the power cord, place the incubator on a stable surface, insert the egg frame, and preheat the unit to ensure proper function and prepare for incubation.
4.1. Choosing a Safe Location
Select a stable, flat, and vibration-free surface for the incubator. Ensure the area is away from direct sunlight, moisture, and extreme temperatures. Maintain good airflow around the unit to prevent overheating. Avoid placing the incubator near open windows, drafts, or areas prone to pests. Keep it out of reach of children and pets to avoid accidental damage. Ensure the location is easily accessible for monitoring and maintenance. A safe and stable environment will help maintain consistent temperature and humidity levels, crucial for successful incubation.
4.2. Assembling the Incubator
Start by carefully unpacking all components from the box. Place the incubator base on a stable surface and align the egg tray or racks according to the manufacturer’s instructions. Gently push the trays into their designated slots until they click securely into place. Next, attach the egg turning mechanism if applicable, ensuring it is properly aligned and functional. Connect any sensors or cables to their respective ports, making sure they are snug and secure. Finally, insert the water reservoir and ensure all accessories, such as the humidity vent, are correctly positioned. Refer to the diagrams in your manual for precise assembly guidance.
4.3. Connecting the Power Cord
Locate the power port on the incubator, typically found at the rear or side. Insert the provided power cord into this port, ensuring it is fully secured. Plug the other end of the cord into a nearby electrical outlet. Once connected, the incubator may display a light or emit a brief beep to indicate power activation. Check the control panel for any initial setup prompts. If an alarm sounds due to low humidity or temperature calibration, press any button to silence it and allow the unit to stabilize. Ensure the cord is not damaged or pinched for safe operation.
4.4; Preheating the Incubator
Before placing eggs, preheat the incubator to ensure stable temperature and humidity levels. Plug in the unit and turn it on. Allow the incubator to run for 24-48 hours to stabilize. Monitor the temperature, ideally between 99°F and 100°F (37.2°C to 37.8°C), and humidity at 50-60%. If an alarm sounds due to low humidity, press any button to silence it. This preheating step ensures optimal conditions for incubation and helps prevent fluctuations during the hatching process. Once preheated, the incubator is ready for egg placement.
Understanding the Incubation Process
The incubation process typically lasts 21 days, requiring consistent temperature and humidity levels. Automatic egg turning and monitoring systems ensure optimal conditions. Regularly test for fertilized eggs to track development.
5.1. Preparing the Eggs
Select fresh, fertilized eggs within 10 days of laying for optimal incubation results. Store eggs pointy-end down in a cool, dry place before incubation. Avoid refrigeration or washing, as this can damage the egg’s natural protective coating. Before placing eggs in the incubator, inspect for cracks or damage. Gently clean any dirty eggs with a soft cloth to prevent contamination. Ensure eggs are at room temperature before incubation begins. Proper preparation enhances hatching success and maintains egg viability throughout the incubation process.
5.2. Setting Up the Incubator
Place the incubator on a stable, level surface away from drafts; Connect the power cord to a nearby outlet and press the ON/OFF button to activate the unit. Allow the incubator to preheat for 2-3 hours until it reaches the set temperature and humidity levels. Ensure all vents and water reservoirs are properly adjusted. Install any additional accessories, such as egg racks or turning mechanisms, according to the manufacturer’s instructions. Once preheated and configured, the incubator is ready for egg placement. Proper setup ensures a stable environment for successful incubation.
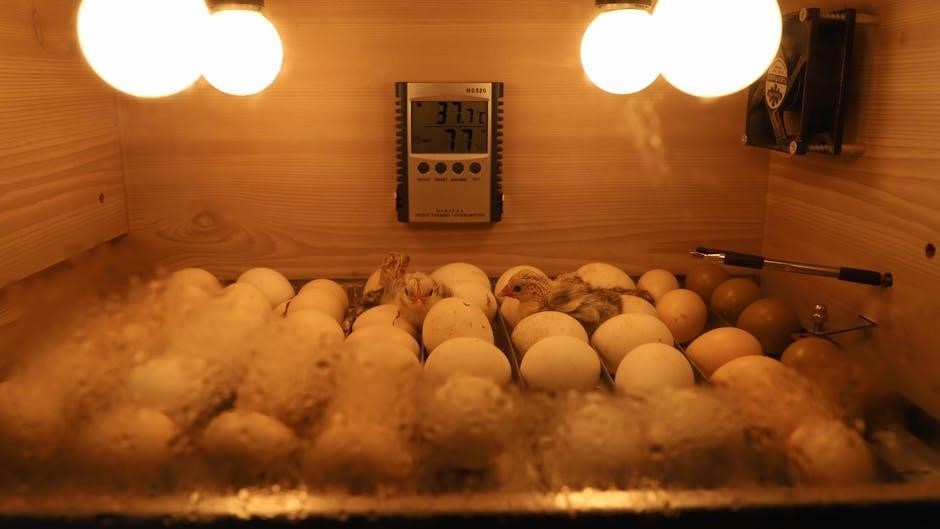
5.3. Monitoring Temperature and Humidity
Regularly check the incubator’s temperature and humidity levels using the built-in digital display. The ideal temperature ranges from 99°F to 100°F (37°C to 38°C), while humidity should be maintained between 50% to 60% during incubation. Adjust the water reservoir or ventilation as needed to maintain these levels. Some models feature automatic alarms for deviations, ensuring optimal conditions. Monitoring these parameters closely is crucial for embryo development and successful hatching. Refer to the user manual for specific calibration and adjustment instructions tailored to your incubator model.
5.4. Automatic Egg Turning

The incubator features an automatic egg turning system, which gently rotates the eggs at preset intervals to ensure even embryo development. This function eliminates the need for manual turning, reducing handling risks. Depending on the model, you can adjust turning frequency and angle via the control panel. Ensure the turning mechanism is clean and free from obstructions. During the hatching period (around day 18), turn off the automatic turning and transfer eggs to the hatching grid. Always follow the manufacturer’s guidelines for optimal performance and successful hatching results.
5.5. Testing for Fertilization
To determine if eggs are fertile, perform a candling test after 7-10 days of incubation. Gently remove the egg and hold it against a bright light source. Fertile eggs will show a dark spot (embryo) with visible blood rings, while infertile eggs will appear clear. Remove any non-developing eggs to prevent spoilage. Avoid testing during the first 4 days, as the embryo may be too small to detect. Always handle eggs carefully to maintain incubator conditions and prevent contamination. Regular testing helps monitor progress and ensures a healthy hatching environment.

The Hatching Period
The hatching period typically begins around day 18-21. Monitor for signs like pipping (small cracks) and zipping (larger openings). Ensure minimal disturbance and maintain proper conditions for a successful hatch.
6.1. When Hatching Begins
Hatching begins when the embryo breaks through the shell, a process called pipping. This typically occurs between 18-21 days of incubation. Monitor closely for signs like small cracks or movement. Avoid opening the incubator during this critical phase to maintain optimal conditions. Ensure temperature and humidity levels remain stable. The process may take several hours, so patience is key. Once the chick fully emerges, it will dry and become active, signaling successful hatching.
6.2. Signs of Hatching
Key signs of hatching include visible cracks in the eggshell and movement from within. You may hear faint peeping sounds as the chick begins to emerge. Pip marks or small holes in the shell indicate the start of pipping. As hatching progresses, the chick will gradually break free. Monitor the incubator closely to ensure proper development. Maintain stable temperature and humidity levels to support the process. Avoid interference during this delicate phase to minimize stress on the chick and ensure a successful hatch.
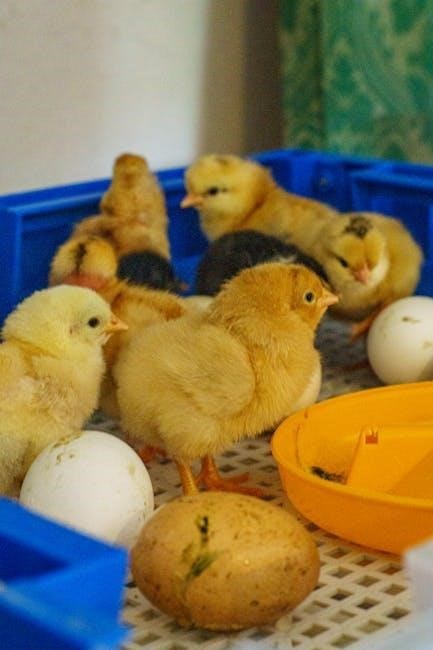
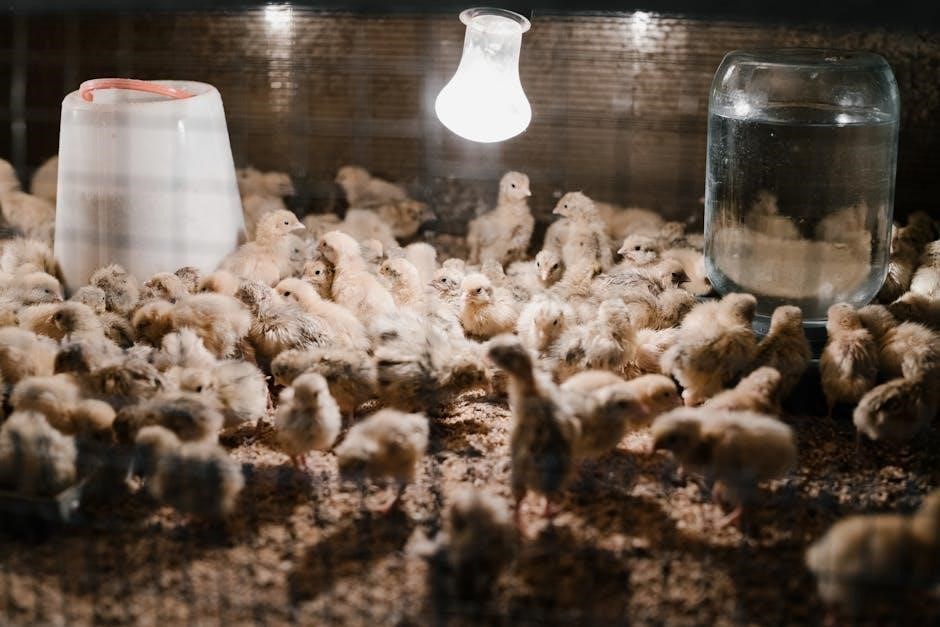
6.3. Post-Hatch Care
- After hatching, allow the chicks to dry completely before moving them to a brooder or safe environment.
- Ensure the brooder is equipped with adequate heat, ventilation, and humidity to support the chicks’ growth.
- Provide fresh water and starter feed immediately to promote healthy development.
- Monitor the chicks for any signs of weakness or distress, and separate them if necessary.
- Clean and disinfect the incubator thoroughly after hatching to prepare for future use;
Proper post-hatch care is essential for ensuring the health and vitality of your chicks.

Maintenance and Cleaning
Regular cleaning and disinfecting are crucial for maintaining hygiene and functionality. Wipe surfaces with a soft cloth and mild detergent after each use. Replace worn parts promptly.
- Clean the incubator after every hatching cycle to prevent contamination.
- Use a damp cloth to remove dirt and egg residue.
- Check and replace air filters as needed.
- Sanitize all components to ensure optimal performance.
Proper maintenance prevents bacterial growth and ensures reliable operation.
7.1. Daily Maintenance Tips
Regular daily maintenance ensures optimal performance and hygiene. Clean the incubator surfaces with a soft cloth and mild detergent. Check water levels and refill as needed to maintain proper humidity. Ensure good ventilation by keeping vents unobstructed. Monitor temperature and humidity sensors for accuracy. Avoid using harsh chemicals that could damage components or harm eggs. Regularly inspect and clean egg trays and turning mechanisms. Disinfect all parts with a solution of water and vinegar. Replace any worn-out seals or parts promptly. Daily checks prevent issues and ensure a healthy environment for egg development.
7.2. Cleaning the Incubator
Cleaning the incubator is essential for maintaining hygiene and ensuring healthy egg development. Begin by disconnecting the power cord and allowing the unit to cool. Use a soft, damp cloth to wipe down surfaces, paying attention to corners and crevices. Avoid harsh chemicals or abrasive cleaners, as they may damage the incubator or leave harmful residues. Remove and wash egg trays and accessories with mild soap and warm water. Rinse thoroughly and dry before replacing. For tough stains, mix equal parts water and white vinegar on a cloth. Regular cleaning prevents bacterial growth and ensures optimal performance.
7.3. Disinfecting the Unit
Disinfecting the incubator is crucial for maintaining a sterile environment and preventing bacterial growth. Mix a solution of 1 part white vinegar to 9 parts water. Dip a soft cloth into the solution, wring it thoroughly, and wipe all surfaces, including corners, vents, and egg trays. Avoid using harsh chemicals or abrasive materials that could damage the unit. After disinfecting, rinse the cloth and wipe down the surfaces again with clean water to remove any residue. Allow the incubator to air dry completely before reuse. Regular disinfection ensures a safe and healthy environment for egg incubation.

Troubleshooting Common Issues
Identify and resolve common issues like temperature fluctuations, humidity imbalances, or egg turning malfunctions. Check settings, ensure water levels, and consult the manual for detailed solutions. Regular maintenance helps prevent issues and ensures smooth operation.
8.1. Temperature Fluctuations
Temperature fluctuations can disrupt the incubation process. Check if the incubator is placed in a stable environment, away from drafts. Ensure the power cord is securely connected and the device is preheated properly. If issues persist, recalibrate the temperature sensor or consult the manual for troubleshooting steps. Maintaining a consistent temperature is crucial for successful hatching, so monitor settings regularly and address any deviations promptly.
8.2. Humidity Level Problems
Humidity level issues can affect incubation success. If the incubator alerts low or high humidity, check the water reservoir and ensure it is filled correctly. Adjust the external water fill port or fine-tune the vent exhaust valve for precise regulation. Avoid overfilling, as this can cause excessive moisture buildup. If alarms persist, consult the manual for recalibration steps or sensor checks. Maintaining stable humidity is critical for embryo development, so monitor levels closely and make adjustments as needed to ensure optimal conditions for hatching.
8.3. Egg Turning Malfunctions
If the egg turning function malfunctions, manually rotate the eggs to ensure even development. Check the rotation shaft for obstructions and ensure it moves freely. Verify that the egg frame is correctly placed and aligned. If issues persist, refer to the troubleshooting section or contact support. Proper egg turning is vital for balanced incubation, so address any malfunctions promptly to maintain optimal conditions for successful hatching.
8.4. Alarm Systems and Warnings
The incubator is equipped with an alarm system to alert you of potential issues. If the temperature or humidity levels deviate from the set range, an alarm will sound. Check the display for error codes and adjust settings as needed. Some models may emit a beep during initial low humidity, which can be ignored by pressing any button. Never disregard recurring alarms, as they indicate critical conditions. Refer to the troubleshooting guide for solutions or contact customer support if issues persist. Addressing alarms promptly ensures optimal incubation conditions and prevents complications during the hatching process.
Advanced Features
The incubator features alarms for temperature and humidity deviations. A low humidity beep may occur initially but can be silenced. Check error codes and adjust settings or consult the manual for resolution.
9.1. Automatic Temperature Control
The incubator features advanced automatic temperature control, maintaining optimal conditions for egg development. Sensors monitor and adjust heat levels precisely, ensuring stability. The digital display shows real-time temperature, allowing easy monitoring. Automatic adjustments prevent fluctuations, crucial for embryo health. Alarms notify of deviations, ensuring prompt corrections. This system minimizes manual intervention, enhancing hatching success rates. Calibrate sensors before use for accuracy. Refer to the manual for calibration steps and troubleshooting temperature-related issues. Proper temperature control is vital for successful incubation, and this feature ensures consistent, reliable performance throughout the process.
9.2. Humidity Regulation
The incubator includes an advanced humidity regulation system, ensuring optimal moisture levels for egg incubation. Sensors continuously monitor humidity, automatically adjusting as needed. The system uses water from the external reservoir, with adjustable vents for fine-tuning. Maintaining proper humidity is crucial for embryo development. Low or high humidity can trigger alarms, alerting you to take action. Regularly check water levels and clean the reservoir to prevent bacterial growth. Proper humidity regulation enhances hatching success, and this feature ensures consistent conditions throughout the incubation period, supporting healthy embryo development and successful hatching outcomes.
9.3. Smart Controls and Sensors
Advanced smart controls and sensors are integrated into the incubator for precise monitoring and automation. Temperature and humidity levels are continuously tracked, with real-time adjustments to maintain optimal conditions. The incubator features automated egg turning, ensuring eggs are rotated correctly without manual intervention. Sensors also monitor incubation progress, alerting you to any deviations. Smart controls allow you to set parameters, view data, and receive notifications. These features minimize manual effort and ensure consistent, ideal conditions for successful hatching. The system’s accuracy and reliability are designed to maximize hatch rates and simplify the incubation process for users.
Congratulations! By following this manual, you’ve successfully set up your egg incubator. Proper use and care will ensure a high hatch rate. Happy hatching!
10.1. Final Tips for Successful Hatching
For optimal results, maintain a stable temperature and humidity level throughout the incubation period. Regularly monitor the incubator’s performance and adjust settings as needed. Ensure the power supply remains consistent to avoid disruptions. Keep the incubator clean and disinfected to prevent contamination. Avoid opening the incubator unnecessarily during critical stages. Follow the recommended egg-turning schedule, either manually or via the automatic feature. Finally, document your observations to track progress and improve future hatches. By adhering to these guidelines, you’ll maximize the chances of a successful hatching process.
10.2. References and Further Reading
For additional insights, refer to the official Egg Incubator User Manual provided with your device. Visit the manufacturer’s website for updated guides, troubleshooting tips, and FAQs. Poultry-keeping forums and online communities offer valuable advice from experienced users. Academic articles on avian incubation can provide deeper understanding of biological processes. Always consult trusted sources to ensure accuracy and safety. Supplementary materials, such as instructional videos and technical specifications, are often available online. These resources will enhance your knowledge and help you achieve the best results with your incubator.